
In this post, I will show you how to make a decorative flower RGB light using an old
cooker washed & cardboard sheets.
cooker washed & cardboard sheets.
Video
You can also watch the video for all the details on how to make this project
Things & Components you need
- 47 * RGB LEDs (2 Pin)
- 16 * 120 or 220 Ohm
- Heat Sink Tube
- Straw
- DC Plug
- Fish Wire for crafts
- Old Cooker Washer
- Wires
- Cardboard Sheets
Affiliate Links
Banggood
Amazon India
Amazon USA
Making
First, take a piece of cardboard piece and mark the outer diameter of the cooker
washer and then remove the excess cardboard sheet.
washer and then remove the excess cardboard sheet.

Now connect the RGB LED leads to the wires & secure them with solder.

Next insert the RGB LEDs into two straws.

Now secure the straws & the RGB Led with the heat sink tube or insulation
tape.
tape.

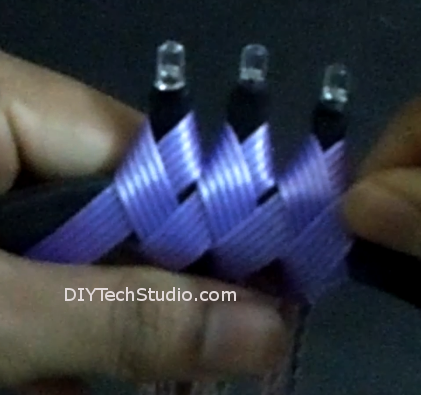
Now place the fish wire on the washer as shown in the below image.

Now place the LED in a such a way that LED is in the back, washer is the middle
& the fish wire is in the front. Now make a knot as shown in the image to
secure all the three together
& the fish wire is in the front. Now make a knot as shown in the image to
secure all the three together


Now make the knots similarly to cover the entire washer & at the end secure
the fish wire with a Zip tie.
the fish wire with a Zip tie.

After making the knots, connect every three LEDs in series to make one pair


Now use the cardboard sheet to cover the back side & also expose the two
external leads of the LEDs. And also cover the front side with the cardboard sheet.
For securing the sheet you can use the zip tie.
external leads of the LEDs. And also cover the front side with the cardboard sheet.
For securing the sheet you can use the zip tie.


Next make a box which can fit exactly at the back & cover all the circuits

Now use the circuit diagram as a reference & make a circuit board with all the
resistors in it. For each pair(3 led in series) needs a resistor.
resistors in it. For each pair(3 led in series) needs a resistor.


Now connect all the Anode of each pair to a resistor & all the cathode together


Now glue the box to the back & connect a DC plug.

To the front glue a photo you want.

Finally power the circuit with 9 to 12v & enjoy the decorative lighting.

Thank you for reading !!!
No comments:
Post a Comment
Hi, Thanks for Commenting !!!